Hardwired Lighting System Using Cat5

Without the use of the on-q enhanced branch hub you are opening yourself to headaches for troubleshooting. After moving from a plain branch hub to the enhanced, we have saved HOURS per job trouble shooting. Given the tiny, easy to break wiring of cat5 and those crappy little connectors on-q sends with thier switches, rarely, actually NEVER, are there jobs where every switch and connection works without redoing something. Being able to turn off every dip switch but one to see if something works or not is invaluable, especially with larger installs.

Granted, throwing away the connectors from on-q and using real butt connectors has changed our workload and troubleshooting tremendously. Why on-q chose to use those worthless connectors that require a wire put into each end instead of connectors where all the wires go in just one end is beyond me. Do yourself a favor and dont use on-q connectors that come with the switch. they are a headache and give every connection two points of failure instead of one.

Given on-q's announement to get out of the home automation business Jan 1st, i think its only a matter of time before they sell off the ALC side of the house. On-q no longer supports ANY of their hai branded products, even if you bought it Dec 31st. They will refer you to HAI for support. Doesnt matter, its the same product. Of course, HAI doesnt own the ALC products so on-q supports those. Appears their goal for automation is all being pushed to Vantage and On-q has rebranded their energy to "packaging" conveinence items with a focus on builders. Just my observation and based on talks with On-q over the last year. I seriously doubt ALC goes away but I sure dont see On-Q carrying that ball. Its just not a part of their new "vision" and direction. They may not even know what they are going to do with it, lol, but its not going away. Someone will carry the ball likely. Im sure Tony has more light on this.

IMO, ALC is still the best solution out there for the money. Not the easiest with needing a cat5 at each locatoin, but is simply WORKS.

Per Tom Cunningham the product manager at OnQ, there are no plans to drop ALC. I told him of the talk on Cocoontech and it bothered him. I also told him of how the trade show staff at OnQ was not aware of ALC and sent people to Vantage, he stated that he thought that would not happen again. If you hear this kind of talk from any OnQ rep call Tom with the reps name.

I reluctantly share Tom's name because he is too busy to take phone calls from every homeowner wanting to put in one system. So, please don't call him unless you are a contractor with volume sales with ALC.

TS
 
Is it possible to trigger Elk rules from the ALC scene switches? ie electric blind control, or what ever....


Oh Yes! The M1 sees any ALC input from any switch.
And....... When using the ALC scene switches youcan setup scenes locally without the M1. So, you can do both.

Local scenes are done by pressing any one of the 4 buttons on an ALC scene switch for 15 seconds. It will then flash indicating that it is in "learn" mode.
Next walk around the house setting the state of all ALC switches you wish to be in that "scene". When done press the scene button again.

Note that anyone pressing an ALC switch for any reason while the scene switch is in learn mode will result in that switch being added to the scene. So advise family members when you are in learn mode.

Outside of the learn mode you can also use the same button to trigger other M1 events but that will require the writing of some rules.

Hope this helps.

Tony Stewart
 
Tony, advise Tom to have ALC in their booth, lol. Simple solution and sends the right message. Thanks for that update! Would love to see ALC get promoted more. Would also like to see them have simpler connection, mabye some cort of rj45 or something. All those wires sure make for a sloppy box.

Again, its the BEST.
 
I 2nd the request for some more neatness. I don't see why these device need pigtails rather than terminals and a RJ45 connection on the back woudl be awesome.

I havent started my install yet but am getting very close.

Ranger: To splice/join the LV wires at the switch location would a ELK white gell filled cap do the trick? And how woudl that work? Do i strip and twist the wires together and then shove them into the gelcap?

While i understand the benefits of the enhaned hub, does it fit inside a structured wiring panel? I plan to have all the cat5 from the switch location homerun to a structured wiring panel.

Tony: You may not be that familiar with Beelzerob's CQC driver for ALC, but i there any limitation to how the ELK interacts with ALC? Is dimming supported, soft on, scanes, etc? I am still on the fence about using CQC to control the lights or the ELK. If i use the ELK to control the lights can i then have CQC control them via the ELK and do i loose any functionaility (i.e. scenes, dimming, etc)?

To make the house the most bulletproof i would like to go the ELK route. That way if i ever sell the house and leave all the gear the new owner has a solid and stable solution rather than something that relies on a PC with windows software which needs updates and maintenance. Any new owner will likely be much more confortable with such a hardware solution. If CQC can control lights via the ELK i can still have the option to have the rules in either the ELK or CQC right?

ALC switches going on sales anytime soon? I need a bunch and was hoping for a sale, but your recent inentory sales didnt include them :(.

Can you possible explain the difference between the (enhanced) branch hubs and the distribution modules because it's not clear to me. The distirbution modules seem to fit nicely in a wiring panel though.

Also how would i tie a 4 or 5 way together in the wiring room? The distribution moduels and wiring hubs don't seem to accomodate this? Is this so uncommon I'll just need to joiin the wires from the 4 aux switches before i punch them down on the distro/hub?

There quite a few of us on the brink of starting installations, while it seems we all understand the concept the details are not always as clear. It would actually be very usefull if you could scan/PDF the instruction sheets for the various ALC products and put them online somewhere so we can read them before purchasing. May save yourself some phonecalls.. :blink:
 
I finally found a support document for the ALC / Elk interface Part # 364864-01. It was very had to find so enjoy.

ALC / ELK interface installation manual

Minor detail Tony, but your website has the wrong picture representing the 364864-01.

In regard to scene switch triggered events on the M1, I understand that the Elk Lighting device #129 to 221 represent the scene switch buttons? I am not if I am reading it (M1-XSP install manual page 13) correctly.

thx,

C
 
M!XSP manual states on page 12 "M1xsp can only support ALC 4 button scene switchen on branch1".

Is this also a limitation with the OnQ ELK<>ALC interface since it's eseentially based on the same hardware just packaged together?
 
Tony, advise Tom to have ALC in their booth, lol. Simple solution and sends the right message. Thanks for that update! Would love to see ALC get promoted more. Would also like to see them have simpler connection, mabye some cort of rj45 or something. All those wires sure make for a sloppy box.

Again, its the BEST.

They have over 1600 part numbers and dozens of subsystems. What's in the booth is hard to say. The new "Studio" line will be a big item in months ahead. Last I heard an upcoming touchscreen for the studio system will interface with the ALC switches in some way? Probably through the ALC serial interface and the ALC scene controller (there is an Elk Versoin). Just theory for now though AND WITH THE ECONOMY AS IS, IT MAY BE A LONG TIME BEFORE ANY MANUFACTURER ADDS MUCH TO THEIR MANUFACTURING OR R&D EXPENSES (The Gospel according to Tony, not OnQ)!

At one time the RJ45 connection was a consideration. However it makes the fit inside the box tougher as the RJ45 connector adds depth or heigth to an already large device . Instead, the connections as is can be made on the top of the box instead of inside the box. This is how I ALWAYS hook them up. This way the arguments with inspectors are less likely!

Try using an adhesive backed wire holder on top of the box to hold the Cat5 until you are ready to connect. They were available from Lowes. However they only stock the bigger ones now (at least around here). Once you convert to making connections outside the box, you will never go back.

Another benefit is that with connections on top of the box you never need to pull the switch out to troubleshoot connections or to read for shorts/voltage etc. Simply pull off the switche's faceplate, reach under the drywall with your needle nose pliars and pull out the beenie connections from the top of the box. The cover plates cover the gap left on top of the box so that you never see it.

TOP OF THE BOX is the key, not inside!

TS
 
M!XSP manual states on page 12 "M1xsp can only support ALC 4 button scene switchen on branch1".

Is this also a limitation with the OnQ ELK<>ALC interface since it's eseentially based on the same hardware just packaged together?

Good Point!
So when planning an install use ALC 4 buttons (up to 31 total) on branch 1. Then expand the interface to allow as many more branches as you need above branch 1. Any addresses not used on branch 1 for ALC 4 buttons can also be used.

In addition, try to group like areas together. Like all downstairs on one branch and all upstairs on another.

TS
 
I finally found a support document for the ALC / Elk interface Part # 364864-01. It was very had to find so enjoy.

ALC / ELK interface installation manual

Minor detail Tony, but your website has the wrong picture representing the 364864-01.

In regard to scene switch triggered events on the M1, I understand that the Elk Lighting device #129 to 221 represent the scene switch buttons? I am not if I am reading it (M1-XSP install manual page 13) correctly.

thx,

C
I'm aware of the picture issue. It's actually the same circuitry as the controller shown in the picture. As yet, OnQ has never supplied me with the correct picture. I may take my own. Thanks tor the reminder.
TS
 
I 2nd the request for some more neatness. I don't see why these device need pigtails rather than terminals and a RJ45 connection on the back woudl be awesome.

I havent started my install yet but am getting very close.

Ranger: To splice/join the LV wires at the switch location would a ELK white gell filled cap do the trick? And how woudl that work? Do i strip and twist the wires together and then shove them into the gelcap?

While i understand the benefits of the enhaned hub, does it fit inside a structured wiring panel? I plan to have all the cat5 from the switch location homerun to a structured wiring panel.

Tony: You may not be that familiar with Beelzerob's CQC driver for ALC, but i there any limitation to how the ELK interacts with ALC? Is dimming supported, soft on, scanes, etc? I am still on the fence about using CQC to control the lights or the ELK. If i use the ELK to control the lights can i then have CQC control them via the ELK and do i loose any functionaility (i.e. scenes, dimming, etc)?

To make the house the most bulletproof i would like to go the ELK route. That way if i ever sell the house and leave all the gear the new owner has a solid and stable solution rather than something that relies on a PC with windows software which needs updates and maintenance. Any new owner will likely be much more confortable with such a hardware solution. If CQC can control lights via the ELK i can still have the option to have the rules in either the ELK or CQC right?

ALC switches going on sales anytime soon? I need a bunch and was hoping for a sale, but your recent inentory sales didnt include them :(.

Can you possible explain the difference between the (enhanced) branch hubs and the distribution modules because it's not clear to me. The distirbution modules seem to fit nicely in a wiring panel though.

Also how would i tie a 4 or 5 way together in the wiring room? The distribution moduels and wiring hubs don't seem to accomodate this? Is this so uncommon I'll just need to joiin the wires from the 4 aux switches before i punch them down on the distro/hub?

There quite a few of us on the brink of starting installations, while it seems we all understand the concept the details are not always as clear. It would actually be very usefull if you could scan/PDF the instruction sheets for the various ALC products and put them online somewhere so we can read them before purchasing. May save yourself some phonecalls.. :)

Beelzerob thinks a lot of the CQC software. His word is good enough for me. Some love a PC to rule the world, others like a hardware based solution like the Elk. Whichever way you go should be the one that like best, a PC or a controller. I assume it is possibel to also use both!

THe Enhanced hub has dip switches to turn off each ALC switches (ALC Communication wise only). The standard hub does not have dip switches. Both hubs add signal conditioning and are important on long cable runs. The distribution modules are simply a nice place to land your connections and do not add signal conditioning or dip switches.

All Aux switches wire directly to the 3 wires on the switche they are to be the 3-way for. TO make 4 or 5 ways, just paralell the additional Aux switches to the same connections. On hubs, they provide some punchdowns for aux switches, but there are not enough to do 4 of 5 ways. These would need to be make outside of the hubs.

I will work on the ACL PDF documents and place them on the web. Look for a post with that in the future. Also feel free to call.
 
Instead, the connections as is can be made on the top of the box instead of inside the box. This is how I ALWAYS hook them up. This way the arguments with inspectors are less likely!

Try using an adhesive backed wire holder on top of the box to hold the Cat5 until you are ready to connect. They were available from Lowes. However they only stock the bigger ones now (at least around here). Once you convert to making connections outside the box, you will never go back.

Another benefit is that with connections on top of the box you never need to pull the switch out to troubleshoot connections or to read for shorts/voltage etc. Simply pull off the switche's faceplate, reach under the drywall with your needle nose pliars and pull out the beenie connections from the top of the box. The cover plates cover the gap left on top of the box so that you never see it.

TOP OF THE BOX is the key, not inside!

I ran cat5e to all my switch locations - the drywall just went up. FYI, there is essentially NO ROOM between the top of my boxes and the drywall. I will have to get a drywall saw to enlarge that space to be able to get to the LV wires. The drywall literally touches the box on all sides. Whatever tool they used to make the cutouts is quite precise.

In some boxes I have the cat5e run into the top of the box and right out the bottom in the hole directly below. So I think I can install the ALC switches, then bring the cat5 run out the front of the box, make the connections, and potentially push the wires outside and onto the top of the boxes. Not sure if that will keep the faceplates from being flush when they are secured. .
 
Instead, the connections as is can be made on the top of the box instead of inside the box. This is how I ALWAYS hook them up. This way the arguments with inspectors are less likely!

Try using an adhesive backed wire holder on top of the box to hold the Cat5 until you are ready to connect. They were available from Lowes. However they only stock the bigger ones now (at least around here). Once you convert to making connections outside the box, you will never go back.

Another benefit is that with connections on top of the box you never need to pull the switch out to troubleshoot connections or to read for shorts/voltage etc. Simply pull off the switche's faceplate, reach under the drywall with your needle nose pliars and pull out the beenie connections from the top of the box. The cover plates cover the gap left on top of the box so that you never see it.

TOP OF THE BOX is the key, not inside!

I ran cat5e to all my switch locations - the drywall just went up. FYI, there is essentially NO ROOM between the top of my boxes and the drywall. I will have to get a drywall saw to enlarge that space to be able to get to the LV wires. The drywall literally touches the box on all sides. Whatever tool they used to make the cutouts is quite precise.

In some boxes I have the cat5e run into the top of the box and right out the bottom in the hole directly below. So I think I can install the ALC switches, then bring the cat5 run out the front of the box, make the connections, and potentially push the wires outside and onto the top of the boxes. Not sure if that will keep the faceplates from being flush when
they are secured. .

Many times the dry wall installers leave a little gap all around the box. But in some cases a cut is needed. THis is normally done with a knife as a drywall saw may cut more than you actually need.

Running the cat5 into the top and then out the bottom is one method. I should have elaborated more on the top of the box method. The method I promote is to leave all of the cat5 outside the box and temporarily fastened to the top until you are ready for it. Your method is nice though in that you are assured that the cat 5 is still in your box and not lost behind the drywall somewhere.

The top of the box method helps to avoid disputes with inspectors. Sure every ALC switch ships with instructions inside that also contains the code that allows the mixing of high and low voltage inside the same box. However, the inspector can still choose to rule against it!

Are you looping one run of cat5 to several boxes? Or is there just some excess hanging below the box?

The looping method is not as safe as individual runs, but does save cable. Also note that with looping (daisy chained) cable runs, you should take the cable back to the controller panel so that both ends are inside. This way, if there is a cut cable somewhere along the path, you can make the one run into two.

TS
 
I have a few locations with the 'top of the box' method.. i have yet to pull of the faceplate to see if the cable is still there and not lost in the wall (that would really suck).

Other place i had the 3 gang switchboxes expanded to 4 gang. The 4th gang is separated with a removable HV/LV divider and has a 3/4" conduit to it from the basement.

My plan is to run cat5 through the conduit, put the insulatation sheeth on it and run it out the top of the box to create the 'top of the box' connections that TS preaches. The HV/LV divider can then be removed and a sceneswitch placed in the 4th gang. If i don't use a sceneswitch then all the LV wiring can run from the switches 'outside the box' to the LV section where all the connections are.

I had a previous question about using the while ELK gelcaps for the connections...is that a good idea?

That was excellent planning!

Yes the Beenies are the way to go. The Gel Cap versions aid in keeping the connections dry and free from oxidation (which is probably not a factor indoors).

OnQ ships with in line butt splices. They too work pretty good if you have the right crimp tool. But that is not why they ship them instead of beenies. You will notice that they also ship with some "Heat Shrink Tubing" inside the same package with the butt splices. This is so that you can heat shrink the connections/butt splices and add insulation value to the connection.

More specificaly it takes the voltage rating of the CL2 connection to well past 600 volts. And helps to reduce inspectors grief over connections inside the box. Here too, making the connections on top of the box may eliminate the need for this.

I like heat shrink but rarely use it.

TS
 
OnQ ships with in line butt splices. They too work pretty good if you have the right crimp tool.
TS

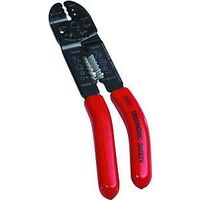
What is the correct crimp tool? Is it a standard size and you can just use one of the normal electrical crimp/stripping tools (see picture below) or should you plan on a special tool to make these connections?

6326649.jpg
 
Back
Top