Sacedog's House Wiring Project

Sacedog

Active Member
Well, I finally got started this past weekend. It took a lot longer than I had anticipated to get to this point, thanks to the lovely City Planning Department. We got started on our construction 3 months late thanks to them. I have never experienced a more bureaucratic organization in my life.

Anyway, on to the good stuff...

ROUGH IN:

I spent time over the weekend doing all of the rough-in. I completed most of the boxes, mud rings, and speaker brackets. A couple of observations:
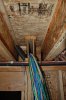
  1. Definitely do your rough-in after the electrician finishes. This is invaluable, as you can avoid all of their wires. They seem to have the philosophy of 'take the shortest path possible, so that we use the least amount of wire....copper is expensive!". Luckily, my electricians are close to being finished, so it helped me figure our exactly where the boxes go. The other advantage is that I can see where the recessed lights go, so I can get speakers placed symmetrically in each room.
  2. Speaker brackets are your friend. Yes, I know, they cost a lot of money for a piece of plastic, but trust me, they are worth it. There is NO way, I would have been able to get the speakers positioned properly after the sheet rock went up. With all of the trusses, TJIs, electrical, sewer, water, etc. in the ceiling, the task of putting up speakers would be a lot more challenging after sheet rock. The added benefit is that I was able to ask my wife if she liked the speaker placement now rather than later.
  3. Make sure your game plan is fluid. I spent a lot of time before this, planning out my wiring. I even have a complete wiring plan in CAD, and got a couple of full size plan drawings printed. I found that when you actually go in to set your boxes, there are "things" that may cause you to move them to other locations.
  4. Bring the right tools! Luckily, this wasn't a problem for me; but for anyone who is planning on doing the own wiring, make sure your have the following for rough-in: Hammer, cordless drill w/ drill bits and phillips head, RotoZip (VERY USEFUL!!!!), tape measure, small level, string, nail puller, pencil, tool belt, extension cord, two ladders. The string is useful for lining up speakers in a room that has trusses going in two directions, or if you need to line up speakers in a weird configuration. The level can be used to get your mud ring at the exact same height as an electrical outlet right next to it (yes, I'm anal, but it is important to me). The RozoZip is a quick way to cut a box in the OSB...my house had a TON of these.
I am taking a half day today, and will finish up the rough-in. I still need to place a couple of boxes, run my future conduit, and install two penetrating fire sleeves. Later this week on Wednesday, Thursday, and Friday, I'll start my wire pulls. I have my dad helping me out, so we'll see how much we can get done in three days.

Let me know if you would prefer me to post pictures here, or if I should just post them to my website, and insert the links here.
 
"The RozoZip is a quick way to cut a box in the OSB...my house had a TON of these."

Are any of these in a common wall between the house and an attached garage? I found out if there are penetrations of the drywall in both directions, then there has to be a firestop between the openings. For example, there is a wall outlet a foot off the bedroom floor, and there is an outlet in the adjacent garage space about 4' off the floor in the same stud bay. The builder had to place a 2x4 horizontally between them.
 
If you live in earthquake country you have to have extra support. The way to get it is to have OSB or plywood on interior walls.
 
"The RozoZip is a quick way to cut a box in the OSB...my house had a TON of these."

Are any of these in a common wall between the house and an attached garage? I found out if there are penetrations of the drywall in both directions, then there has to be a firestop between the openings. For example, there is a wall outlet a foot off the bedroom floor, and there is an outlet in the adjacent garage space about 4' off the floor in the same stud bay. The builder had to place a 2x4 horizontally between them.

Yes, that is the case, and my builder talked to me about this. If there are two holes cut in the same cavity in a fire-rated wall, but on opposite sides, there needs to be a block in between them. All of the walls between my garages and the house are 1 hour fire rated. It was either that, or install a residential fire sprinkler system in the house!
 
If you live in earthquake country you have to have extra support. The way to get it is to have OSB or plywood on interior walls.

Yep. We have a two story house, but it may as well be a three. We build on a hill, and built to grade (i.e. we didn't fill or cut the grade for the foundation). On the down slow side, I have a nice storage space (800 sq ft) that has 9' to the ceiling. I had to have a lot of seismic bracing, and sheer wall. The funny (not really) part is that CA just re-classfied a lot of counties for their "earthquake classification". Our county's classification went down, so if I had started in 2008, I would not have needed a few thousand dollars worth of siesmic "stuff". I'm not complaining though, as I always prefer to over-build.
 
I'm lucky to live in the midwest where we don't have earthquakes. Well, except for this weekend.

I hope you enjoy your new house as much as we enjoy ours!
 
No pics of the rough-in yet. Here are some pics of the house construction. I'll update more tonight.

Ya ya, your house is very pretty, but where's the wire???? ;)

All kidding aside, great looking lot! I didn't know there were any pretty places left to build in CA.
 
No pics of the rough-in yet. Here are some pics of the house construction. I'll update more tonight.

Ya ya, your house is very pretty, but where's the wire???? :(

All kidding aside, great looking lot! I didn't know there were any pretty places left to build in CA.

LOL! My lot's not that pretty, but it has a great view. There are a lot of great places left to build up in the Sierras...unfortunately. I wish they would just stop building. ;)

I'll try to get some pics of my rough-in up tonight. I haven't pulled any wire yet; that starts Wednesday.
 
Well, only one picture to share...I was just too tired to take more!

We got started on the wiring late yesterday, after prepping our wire paths, and drilling lots of holes. We started on the 2nd floor, and are just about finished (should finish up tomorrow morning). I was lucky to have a straight path from the basement to the attic. We set up a pull rope, and my dad would stay in the basement while I pulled up. When I had pulled up the bundle, he would pull the rope back down, and come up to help me run the wire. Where the wire came out in the basement, was right next to 2 TJIs that were butted up against each other, forming a nice big channel right to the wiring closet. That kind of worked out perfectly (picture below).

So, I have learned a bit more in the last couple of days. The most important thing is to make sure to have a low speed corded drill to bore your holes with. A cordless drill is useless for this task. Luckily, I knew this from past wiring, but it was reinforced again (I had a brand new Makita 18V LiOn high torque drill, and gave it a shot thinking it might have a chance...didn't even get a 1/2 inch before the auto clutch kicked in). The other thing I learned is to leave enough slack for your runs. The little extra expense of the wire will be worth it when you try ot go back and clean it up after you are done pulling.

Tomorrow, I'll finish the 2nd floor, clean up the runs in the attic, and then work on wire paths and drilling for the first floor.

If anyone has any suggestions as to what type of bit to use for drilling through 3-4 2x6s for the window contacts, I am all ears. The electrician was saying a "security bit"...but I wasn't sure what he meant.

Oh, and last thing I learned...wiring your house is not fun. Rewarding, yes; Fun, no. ;)
 

Attachments

  • TJIs.jpg
    TJIs.jpg
    175.9 KB · Views: 261
What we used to get to the windows was a 1/4" auger bit, and also a 90 deg attachment in case there wasn't enough room in the stud cavity to get a good angle. On some of the longer holes, our real problem was that the bit needed to get through to the window was much larger than the cavity would allow, even with the 90 attachment, and even when drilling from an angle. In one particular case, what we had to do was drill a much larger hole at first with a shorter bit so that when we drilled with the actual 1/4" bit, we could add extensions to it while it was in the drilling position, and the larger hole was because the extension had a larger diameter. So, basically drill as far in as you can, then add an extension and keep drilling, etc, rinse and repeat until you hit the window gap.

I don't know how your windows are situated, but in several cases, we were all prepared to drill through 4 4X6's to go in from the side, because that's what we'd done on all the other windows (where there were only 2 4X6's), but then I noticed that the bottom of the window casing only had a single 4X6, and instead of coming in the side, I came in from the bottom and angled the hole so that the wire could be routed inbetween the window and the framing.

Moral of that story is to look at all the possible routes you might take to get your wire where you want....don't get fixated on a particular method. ;)
 
More pics or BAN!

haha, can't wait to see more :)

OK, my pics have been lacking. It's just that when I get done working for the day, the last thing I think of is taking some pics of the work I have completed. So I took the day off today, and went over to snap a few pics.

So far we have completed all of the runs to the 2nd floor, and the longest ones on the first floor. Yesterday, I started to do some cleanup in the attic; dressing cables, attaching them to studs, and wrapping them up in the boxes.

Ccat_Ring_Close_Up.jpg
I am using a bunch of these rings for hanging the cable between the TJIs. They snap open and closed, so they make running new cables easy.

Kitchen_Chase.jpg
This is the chase behind the kitchen, where all of the wire for the 2nd floor runs through. You can also see my future conduit to the right. I am also using this chase for some of the runs to the first floor. Once I am done with them, I will install some of the Caddy Clips (above) to take the stress of the cables.

Exit_Into_Kitchen.jpg
This is right above the chase in the picture above. This is where some of the nearby drops for the first floor are run. You can see that I have used some 2" conduit where the wire makes the turn, in order to keep a good bend radius.

Entry_Into_Attic.jpg
This is coming out of the top of the chase. Once again, you can see my use of the 2" conduit to provide a good bend radius. You can also see my future conduit here. I will probably add a 2nd future conduit before I am done.

Fire_Sleeve.jpg
Here are the longer wire runs for the first floor, coming into the garage. The wall between the house and the garages is 1 hour fire rated, so I had to use a fire sleeve for the wires. When I am sure I am done with these runs, I will need to fill the rest of the space in the fire sleeve with fire caulk.

Game_Room_TV.jpg
Here is one of the many drops upstairs. This one is for a TV, and has 1 RG6-450, 1 Cat6 (data), 1 Cat5e (phone), 1 Cat5e (serial/IR), 1 Cat5 low skew (std def video), and 2 Cat5 low skew (HD video). You'll notice that I have attached the wires to the stud with zip ties that have a screw hole in them. I highly suggest doing this, as the sheet rockers are brutal to cabling in the walls. Just make sure not to over tighten the zip ties.

MPOE.jpg
This is the service entrance to the house. I have run 2 RG6-450 and 2 Cat5e for cable and phone. I ran 2 of each, in case there was ever an issue with one of them. The rest of the cables here are for security (I'm putting contacts on all exterior panels).

Wiring_Closet.jpg
Here is a pic of where my wiring closet will be. I have had the HVAC sub install a 110CFM Panasonic whisper quiet fan in here. If you look closely on the floor, you will see 2 covers for a duct; one in the wiring closet and one right outside of it. The duct on the outside will be connected to a register in the toe kick of the cabinet in that hallway. The fan will then pull air from outside of the closet, in order to provide some cooling. I also had the framer space the studs on that wall for 3 cans, with a 6" space in between for running wires out of the sides of the cans. Oh, and if you are wondering where all of the wire is, it is sitting in the basement, directly below the wiring closet.

I wont be doing much work this week; mostly just some wire dressing and finishing the 2nd floor. I also need to drill for all of the first floor drops. The week after this I will try to get the first floor finished.
 
Back
Top