LV Plates New Const. What type would you use

Bzncrewjr

Active Member
Our electrician is starting his thing, so the time to start pulling my wire is coming soon.
 
There seems to be 2 schools to accomplish this.
 
1) Nail a plate to the stud and pull a wire down to it.   Let sheetrockers cut the hole.
 
2) Leave the wires attached to the stud.  Measure/record where it is.   Cut the hole after the sheetrockers are done and install a post LV plate.
 
 
I'm thinking #2 has less chance of them cutting my cables, but more work for me.   Maybe less wall labor costs too.
 
What say you gurus?
 
--Russ
 
#1
photo_112-1718_install_a.jpg

 
#2
 
616ufAUr09L._SL1244_.jpg
 
I am a newbie, so take this with a grain of salt.
 
For my remodel I did a combination of both.  I put in my own LV plates nailed to studs, but I kept the wire deep in the back of the stud cavity.
 
This way after the sheetrockers went crazy with their rotozip I could come along and reach through the wall plate and easily grab the wire.
 
I like the new work boxes/plates better as they are more stable, slightly bigger (NuVo keypads don't really fit in old work wall plates), and easier to keep parallel.
 
But I also kept my wires out of range of their rotozip so I wasn't too woried about them damaging a wire.
 
With either of those styles you're still going to have to secure the wires.  #2 gives you a little more flexibility, in that you can install wire that might never get used and thus never have a plate in a location it'd never been needed.  
 
One tip, take progressive pictures of EVERYTHING.  Do it RIGHT BEFORE the drywall is installed.  I can't tell you how many times I've gone back and reviewed the pictures I'd taken.  Seeing just where the stud/wire/plumbing is located before installing something else.
 
Walk each room with a digital camera and click, turn slightly, click, turn, repeat.  Get the whole room, including ALL walls, windows, floor and ceiling.
 
Video is good but that makes it tedious to find something later.  I have videos of the same thing and have literally never used them.  The pictures, however, have been incredibly helpful.
 
As for measurements, Bosch (and others) make automatically leveling laser pointers.  I used one for all my ceiling speaker locations.  I didn't install any of the speakers during drywall.  I preferred to wait until we used the spaces to determine just how much sound we need.  I bundled the wire above each location and stapled the bundling zip tie to the framing above (not the wire itself).  I then put the pointer on the floor and spray painted an X on the rough sub-flooring.  I then made an x/y measurement from the nearest walls and in some cases also spray painted that, or I wrote a large legible note on paper.  I then took pictures of that.  This way I can go back at any time, do my x/y measurements (review the framing pictures too) and use the same laser pointer to pin-point where to find the wires above.  Works great.
 
I went with #1 on one new home build and a bit of micro managing the GC relating to respect between the trades and a threat of a loss of monies should the GC screw up (just mild like GC wouldn't get paid for a mickey mouse job).  It was just a timing thing and I personally did the LV stuff / plates soon after the electrician had done the same.  It was mostly relating to the inter trade respects shown by the sheet rockers to the electrical stuff. 
 
That said and unrelated but relating to short cuts relating to time and efforts and money and trust in compliance (not always a good thing).
 
Just last week ago or so while banking the teller told me he was learning to fly and really only cared about that rather than being a bank teller (he was bored with it).  I could see the fire in him relating to the ingraining of basic steps relating to preparations before getting in the plane.  He mentioned the logging of many hours already and started to get bored a bit with doing touch and goes.  A childhood friend learned how to fly at 18 purchased his own plane and was a millionaire by the time he was 23.
 
Many years before learned to fly from a 22 year old instructor full of a lot of fire and always promoting the step by step pre flight checkout stuff.  Basics like looking to make sure you had fuel or just moving the widgets on the plane .... pre flight check list stuff... (including even the basics of a visual walk around inspection)
 
One day instructor called me to cancel my stuff on a Saturday morning.  I was fine with it as he was a bit excited that he was getting married and was much preoccupied with that stuff and future WAF stuff and making a bit more monies.  Well he went flying with a newbie who purchased a plane for himself and his son and was sort of in a rush to learn how to fly his new plane (well just a new toy).  All three of them for whatever reason died that weekend; mostly probably because of the rush in a learning mode skipping steps and hitting power lines that they didn't see? Or just confidence in doing something that they speed up for no apparent reason other than the quick learn of a new toy.
 
I use them as designed, #1 if new construction (or if existing walls but replacing drywall) and  #2 if remodel work where I'm adding into existing drywalled locations.  .  I've had a variety of new construction work done on my house and used #1 for all of that.  I also re-did drywall on a couple walls in a room (termite damage) so I used #1.   Everywhere else it's obviously #2.
 
Given this sounds like a new build,  the LV will be stapled to the studs no matter if you use #1 or #2 (required by NEC).  Only if you ran it after the fact (fished through closed wall cavities) would you get away without staples.     You could pull the staples after the rough electrical inspection is completed, if you don't want to deal with all your LV stuck to studs. 
 
I've used the ones shown in #1 multiple times with new construction and haven't run into any issues. Just be sure that the wires aren't close to the front of the box and you should be fine.
 
I typically use the ones from Carlon which create more of a "box" and have holes for conduit to be mounted to - or for your wires to pass through. Typically, I either simply pass wiring through them and let the excess hang lower in the stud cavity (so none is IN the "box" to be damaged) or coil it up such that the loops are large enough that they can fit into both the upper and lower holes, basically as a place-holder for the wire.
 
You need to pay attention to what is intended on being mounted to them....many times the rings stick proud of the surface or create other issues. You also need to keep them square and pay attention to the mounting. Also, not everything is best off being mounted to rings. SOmetimes they're overused.
 
Last build used metal mudplates instead of plastic rings.  Drywall cuts were neatly done.  I put blanks on all of them post contruction until I got to them.  I even used them for ceiling speakers; then cut them out when installing the speakers.  Having blanks every were was very low on the WAF.
 
I used tie wrap way back of the wall stud with small drywall screw tacked sideways and left a foot or two overhang inside of the wall.
 
Post build new wiring I used double and single Carlon plastic rings.  I tie wrap the wires to the inside pieces but they are really close to the surface.
 
I also tried the flat metal ones where you fold tongues to the inside and use a drywall screw to keep it in place.  The edges were too sharp on these.  They were way cheap and sold by the dozen.  The Carlon ones are more expensive.
 
I'm liking Bill's thought of leaving the wire behind the drywall until I'm ready for it.   Pete's WAF comment brought out a conversation I had with the boss today.  
When I mentioned "We could leave a blank on the ceiling if we don't choose a hanging fixture right away." it was met with strong resistance.   "That would look awful.  A blank plate up there."
 
And since building a new house, moving into it has enough stress, maybe this would buy time to build the wall plates in the rooms as needed.  
 
Now to find me one of those "leveling laser pointers".   
 
Is there a best practices for leaving the wires (CAT6 & Coax) tied up on the studs so the sheetrockers can do their thing?   One place I'm concerned is exterior walls where they blow in that foam insulation into things.  
 
--Russ
 
DEL brought up the main thing I wanted to point out... the boxes for #2 are definitely not as flush to the wall and depending on what you put in there, it's quite easy to end up with a gap between your wallplate and the box.  That's actually a frustration I have quite often with that style... although I've definitely used plenty because I do a lot of retrofit work.  And I agree with his comment that boxes are over-used... I'm surprised actually how many times we see people use boxes for something that'll never cover that hole properly.
 
The rotozip is barely deeper than the drywall.  Follow the lead of the electricians - they work around the drywallers every time.  I liked drvnbysound's advice too to either pass the wire entirely through the box or create the loop using the holes top and bottom.
 
Yup none of the plastic rings that I have installed in Midwest after construction are totally flush.  I have had to use deep covers on them.  I did also trim the inside of the wall plate to make them flush. 
 
They are thin but not thin enough.  The metal ones are thin and have sharp edges.  Here in the midwest I used these for keystone speaker posts for the externally mounted on the wall speakers.  They are behind them and you do not notice the speaker posts.
 
If there is good communications between the electrical folks and drywall folks there are no issues.  That said helped a friend with his new home and did the metal mudplate prewire there.  The house is around 6K sized and there were about 10 drywallers in and out of the house in two days and they did very good work and they were fast.  It is understood about doing the pictures for measurements relating to what is behind a wall.  It is just a PITA and with no boxes and using rings it isn't as nice looking.
 
5303f1f5-515c-45df-b049-851aed1d20e7_400.jpg
ring-1.gifspeakerposts.gif
 
These work better but sort of fragile compared to a metal mudplate.
 
photo_112-1718_install_a.jpg

 
Personally here I used metal mud plates as mentioned previously pre dry wall and plastic rings post drywall.  I wanted uniformity here with the electrical boxes such that every mud plate installed was totally even with the electrical boxes whether they were low or high.   The metal mud ring here provided a solid base for me and it was already pre cut.
 
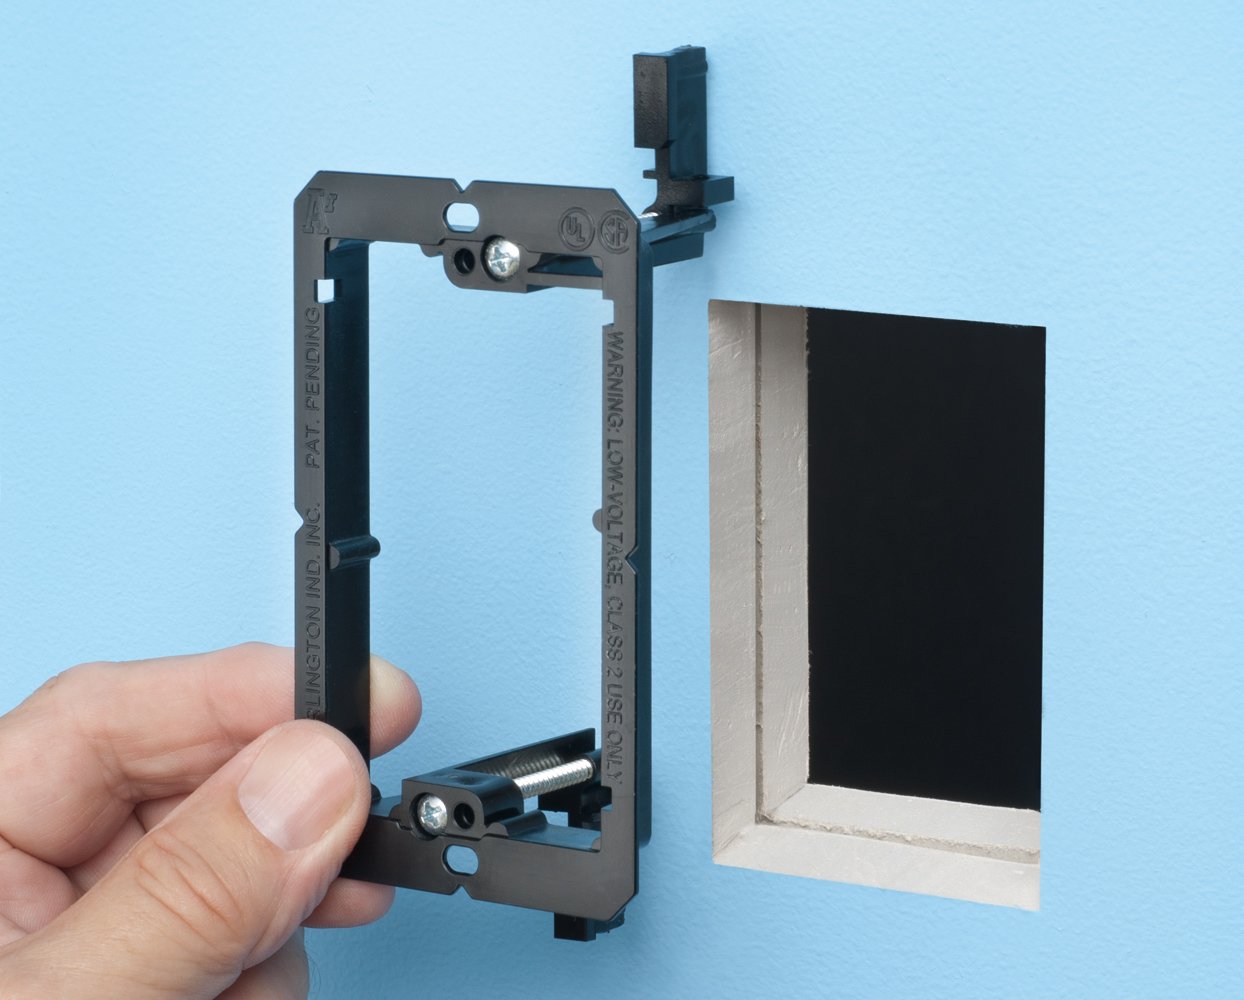
These were installed with no boxes or plastic boxes if necessary for speakers, wall keypads, network LV or whatever right after the electrician had installed his stuff.
 
I did want music and networking right away.  Initially did use blanks and that was low on the WAF and a push to terminate these right away.  The in wall speaker mud plates were totally removed and the in ceiling or wall speakers were larger that the mud plates and holes.  I did bulk purchase these as I did in the Midwest by the case way back then.
 
So first LV setups related to speakers and keypad controls for the speakers then network / television all done up within a month or two.  The alarm prewire had been done and here there was no rush to terminate these and the ends were capped such that you didn't see them. (doors and windows).
 
Here are a couple of pictures from an install I did showing what I was talking about...
 
Keypad wiring looped (and run parallel to HV wiring - OMG!!!!):
index.php

 
Here's a better shot of the idea with a coax that was run for a sub:
index.php
 
Back
Top