[How To] How To Wire A Wireless Doorbell to Elk M1 Gold

GraysonPeddie

Active Member
[How To] How To Wire A Wireless Doorbell to Elk M1 Gold

Products you'll need:
  • Elk M1 Gold or any alarm/automation panel that supports analog zone (I will give instructions for Elk M1 Gold, as this is the one I only have)
  • A very long two-conductor wire -- like a speaker wire (you'll want something much longer than you need -- for example: you'll want a 25' wire even though you're going for a 15' wire)
  • Any wireless doorbell -- perferably battery operated (why would you want to go with A/C while you can go with a battery-operated wireless doorbell when the electricity goes out?) I've chosen a $15 Heath Zenith wireless doorbell, bought from Home Depot. Don't forget the C-type batteries.
  • Wire Nuts (easier than having to solder two wires together)
  • Multi-purpose screw driver (even though you can use individual screw drivers, it helps to keep al the screw heads in one place -- different sizes of flat heads, Philip heads, etc.)
Before you begin:
  • Test to make sure the wireless doorbell still works after you install in the batteries for both the transmitter and the receiver.
  • Keep the transmitter close to you when connecting the receiver to Elk, so that you can see the drop in voltage when you press the doorbell.
  • Don't disconnect the wires that connect to the battery contacts. You may not get the response if placed near Elk M1 Gold, like too much interference coming from Elk M1 Gold or maybe there are too many metal objects that will degrade the signal's path to the wireless doorbell.
Step-by-step:
  1. In the doorbell transmitter, use the jumper that came in the bag and insert the jumper in the first pair of pins at the bottom of the transmitter (in case of "horizontal direction (battery at the top and pins at the bottom)," insert the jumper to the first pin at the way left). If the speaker is connected to the doorbell receiver, you should hear a single "ding." (For those who are deaf, just insert the jumper as instructed in this paragraph.
  2. Unscrew the circuit board from the enclosure.
  3. Cut off the two wires that connect to the internal speaker.
  4. Wire-nut the two wires that will go to the Elk M1G control panel.
  5. Connect M1 Gold to your computer and turn on Elk M1 Gold.
  6. You may get a trouble message. If so, just set the zone type to analog.
  7. In your keypad, go into System Diagnostics, choose to check for zone voltage, and scroll to the selected zone where your doorbell receiver is connected to.
    • Normally, you should see 3.8 volts, but sometimes it may flictuate.
      A high voltage, like 3.8, means "off." This is like if you're not hearing a sound from the wireless doorbell.
    • Press the doorbell, and you will see a change of voltage -- in this case, mine mentions 3.1 volts (this is the low voltage).
    • If connected to a speaker, the "ding" should sound about 4 seconds long. After that, Elk will show 3.8 volts.
  8. You could have the rule performed every four seconds to determine if it's at 3.1 volts; however, it's ineffective, because it's a "hit-or-miss" and there's a lack of precision when changing the duration of time for "condition-checking the voltage." So, here's what I'll set this up for:

    Code:
    Rule #1:
    WHENEVER EVERY 1 SECONDS
    	AND Wireless Drbell (Zn 1) IS EQUAL TO ANALOG VALUE 3.1 VOLTS
    	AND DrBllActiv'd (Counter 3) IS EQUAL TO 0
    		THEN ANNOUNCE Visitor at FD (Task 14)
    		THEN SET DrBllActiv'd (Counter 3) TO 1
    Rule #2:
    WHENEVER EVERY 1 SECONDS
    	AND Wireless Drbell (Zn 1) IS EQUAL TO ANALOG VALUE 3.8 VOLTS
    	AND DrBllActiv'd (Counter 3) IS EQUAL TO 1
    		THEN SET DrBllActiv'd (Counter 3) TO 0

    It's not that instant, but 1 second is good enough and that you have a counter for the two rules for making sure that rule #1 gets executed only once when there's a voltage change and that rule #2 will set the counter back to the original value once the voltage change equals 3.8 volts.
Once you do all that, then you have a wireless doorbell integrated into your home automation network! You can even set this up so that the rule will determine which arming state it's on, so like if the security system is in away mode, you can have it not make any sound -- no announce, no beeps, nothing.

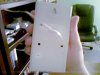
I've attached the photo showing the back of the doorbell receiver.
 

Attachments

  • WirelessDoorbell.jpg
    WirelessDoorbell.jpg
    214.5 KB · Views: 188
Grayson,

Nice job! I didn't realize you could perform a rule via ELK M1 by analog voltage. I will most likely use this feature in the future.

Thanks,

Rod


When I press the wireless doorbell button, my "modified" wireless doorbell receiver receives the signal from the transmitter, and then sends it to Elk M1 Gold (a security and automation system from Elk). Elk announces "someone at front door" and while doing so, it makes the light go off and on.

Click in the image above to watch the video.
 
Now that you've got this set up, don't forget that you can use the same procedure to monitor other things.

You can replace the switch in the doorbell transmitter with a different switch (like a magnetic door/window switch), or several switches in parallel, to monitor anything you want. I have used a wireless doorbell to monitor the status of a washing machine (the light goes out when the wash is finished and effectively "presses the doorbell" to let me know it's finished).

Some of the receivers will work with multiple transmitters that can be set up for back door and front door, for example. The front door transmitter causes the receiver to DING-DONG while the back door transmitter just causes it to go DING. If your Elk script can tell the difference between one ding and two, you pick up two sensors with one receiver.
 
That is, if you have a relay for that. How can I do that when it comes to checking for voltage? Plus, how do I trigger an alarm if a certain voltage is reached, like when a door is opened where there's a magnet next to a reed switch? I'd rather get myself a GE NX-548E wireless receiver and a door/window sensor. Much easier.

I'd rather get a second wireless doorbell transmitter/receiver and set a jumper to a different pin than just having to solder a wire to eliminate the resistor and solder a wire to the transistor just to connect to Elk M1 Gold. I just want to save myself a trouble by not having to use soldering ion.

My apartment doesn't have a washer/dryer hookup, though.
 
That is, if you have a relay for that. How can I do that when it comes to checking for voltage? Plus, how do I trigger an alarm if a certain voltage is reached, like when a door is opened where there's a magnet next to a reed switch?
You wire the switch in parallel with the switch on the doorbell transmitter (or replace the button switch). Your reed switch opening and closing is just like someone pushing the button.

On the Elk side, you shouldn't need any other hardware. You just need to look for the voltage going up, then down, then up again. If it doesn't go up again within a certain time (1 sec or so), then you got a a single DING. If it goes up, down, up you got a DING-DONG. You act appropriately. I don't know how easy it is to do with the Elk.

My apartment doesn't have a washer/dryer hookup, though.
I have hookups but no washer/dryer. They are down two floors. That's why it's nice to have something tell me when they are finished.
 
Okay. Let me get this straight.

For a single ding, my voltage is currently alternating between 4.2 to 4.3 volts. If I press a doorbell button, I get like 3.6 volts.

So:
4.2 volts -> doorbell pressed -> 3.6 volts for 4 seconds -> after silence, goes up to 4.2 volts

So, what you're trying to say is this:

4.2 volts -> doorbell pressed -> 3.6 volts for 2 seconds -> 4.2 volts and immediately down to 3.6 volts for two seconds -> back up to 4.2 volts

Am I getting this clear?
 
I think you've got the right pattern. But I don't know about the times. If the transition between DING and DONG is too quick, you won't be able to pick it up with the Elk - unless you check very often.

As I understand it, your voltage goes down during a DING. Assume "-" is a high voltage and "_" is a low voltage.

The DING pattern would be: ----_----
The DING-DONG pattern would be: ----_-_----

The "----" indicates the inactive state.


When I was playing with a doorbell several years ago, I found two pins on one of the chips that were activated for front and rear doors. It required some soldering, but I used the signals from them instead of getting the speaker output. These were much cleaner to work with but required more work.
 
So in this case, maybe this will require less than 100 milliseconds between the transitiion from the DING to a DONG?

I can only check for a time interval of one second when checking for a whenever/then condition. In that case, I'd have to connect a relay to the speaker wires, which I could do that with wire nuts, but I don't know how to bypass the resistor that's built into a cirbuit board... :)

Oh, and by the way, I think it seems logical for me that it's better to have a second doorbell receiver and set tthe "jumper" to a different "channel," meaning that one transmitter/receiver can operate in a different frequency than the other. Although it does require a second zone and that there can be a second wire travelling next to the base of the wall, until the end of where I want to put the wireless receiver at, this cuts down the time for when the rule gets triggered and eliminates the need for a counter. With an analog zone, it will take more time to trigger a rule, but with a relay (when setup properly), a counter of 2 will trigger a rule when the non-alarm zone gets "unsecured" again.

So with an analog zone and a one-second interval, with a press of a doorbell button, this allows me to be informed immediately instead of having to wait about 4 seconds or so.
 
Back
Top